Welcome to week three of Schoology November! If you missed the first two weeks about Discussions and Google Drive Assignment App be sure to check them out.
This week we will look at the resources within Schoology. This tool is Schoology is extremely useful for collaborating and sharing. No teacher has time to reinvent the wheel, so saving and sharing course resources in Schoology helps to streamline this process.
There have been lots of questions and some confusion about the resources; specifically how to add to your resources, and how to share them with your team or colleagues.
Here is a 6 minute video walk through of the resources tool.
Welcome to week two of Schoology November here on the blog. Be sure to check out last week's post about Discussions.
Google Drive Assignment App
At the elementary level the way we use digital tools is not the same as middle and high schools, for obvious reasons. Often a teacher will tell me, "I don’t need an LMS because I’m not grading papers online or requiring students to turn things in electronically." While we may not be giving students “grades” or closely monitoring due dates, the Google Drive Assignment app within Schoology is worth exploring. If you ever have your students work on a doc, slides, drawing, or sheet, and you want to be able to see and/or comment on their progress, then I highly recommend using this tool!
Teachers can push out a template of any Google Drive product (doc, slides, drawing, or sheet) and this app will make a copy for each student. Gone are the days of sharing with students, having them make a copy, and share it back to you. You can also avoid the flood of emails you get when you ask students to create and share a document with you. Even if you just push out a blank document, I think this process is worth it. Using the Google Drive Assignment App creates a folder of all the student assignments in the teacher’s Google Drive. This alone can save you hours of searching for student documents. You can also differentiate by individually assigning your templates to select students or groups.
Check out the video below where I demonstrate how to set up a google drive assignment, and the second video to see the student's view.
It's been a while since I've posted on here, and A LOT has changed in the last several months! The biggest change to our school (tech-wise) has been the adoption of Schoology as our LMS. The goal behind adopting this new platform is to give our teachers, students, and families a one stop shop for everything digital. Schoology also offers some really powerful collaboration and assessment tools. I plan to feature different tools here on the blog each week for the month of November.
SCHOOLOGY DISCUSSIONS
WHO?
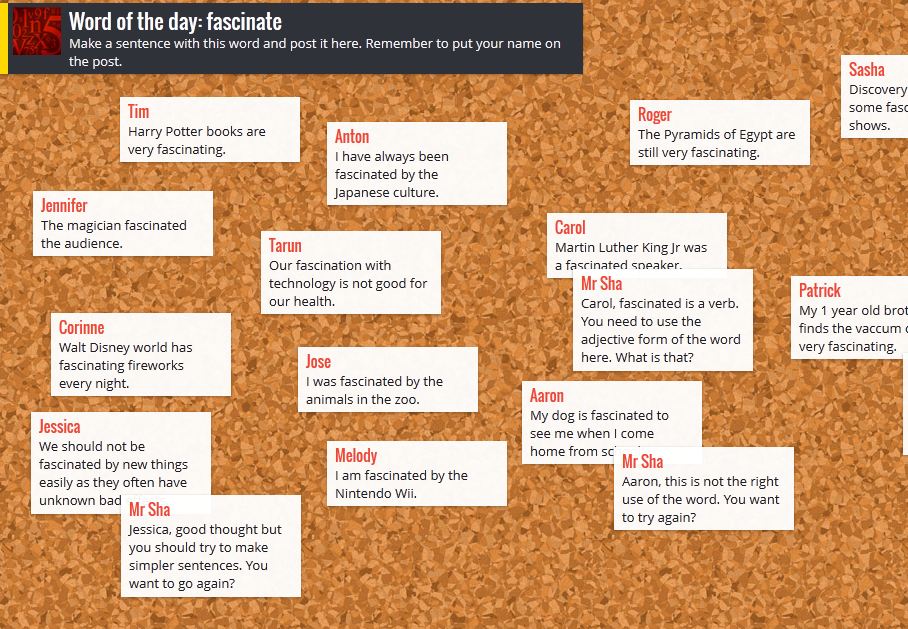
Online discussions are not reserved for older students or online courses, learners of all ages can benefit from this tool. Schoology gives students the option to respond with text, audio, or video, so the needs of various learners can be met in one place.
WHAT?
After reading TFK, Science Stories, or other text post a 3-2-1 (3 things you learned-2 questions you have-1 connection you made)
After watching a video post a question or prompt
During or after a read-aloud post a question or prompt
Post thoughts or questions for book club members to respond
Ongoing discussion where students can make book recommendations
Use the video recording tool to give a book talk
Post a problem of the week for students to solve. Give them the choice of how to respond (audio, video or text).
WHEN?
For students in our elementary buildings who do not take their devices home, I would encourage you to give students time at school to respond to the online discussion. This could be part of math, reader's, or writer's workshop.
WHY?
Writing takes more time to process and reflect on what you want to communicate.
Encourage all students to participate, the shy students get their voice heard and the ones who are always willing to share won’t dominate the conversation.
Documentation of a student’s thoughts and responses.
Practice keyboarding skills.
Practice speaking/audio recording skill.
Practice online communication skills.
Authentic practice of digital citizenship skills.
HOW?
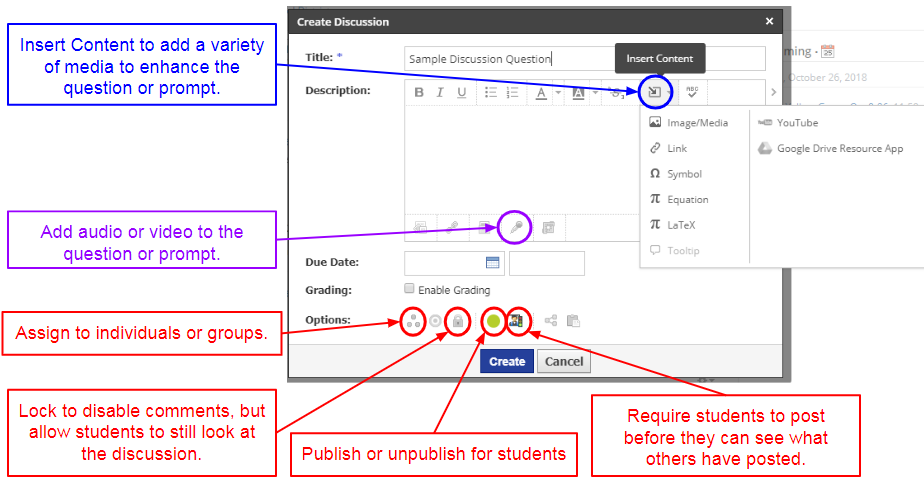
Preparing your students to participate in online discussions can seem like an overwhelming task. I highly encourage you to take the time to set up clear expectations and practice discussion techniques prior to having them go online. The investment in time up front will be worth the headache it saves you in the end. I have adapted this slideshow from second grade teacher Sophia Garcia-Smith, and it is FANTASTIC for teaching kids how to respond to online posts.
Setting up discussions in Schoology is quite easy, follow the steps in the video, and see the graphic below.
Online discussions should NEVER fully replace face to face interactions in a our elementary classrooms. Like anything, balance is necessary, so I encourage you to consider the online discussion tool in Schoology as a way to engage students in a different way.
As always please reach out to me with questions or feel free to comment below!
Here in Minnesota we are desperately looking ahead to spring. The dream of being able to walk outside without a coat seems like it is close to becoming a reality, and with daylight savings this past weekend we can drive home from work without turning on the headlights! However, when you work in a school, you know that with spring comes standardized testing. While I look forward to the warmer weather, I always dread the months of April and May because of the high stress feeling in the building. Earlier this winter I saw this post on Twitter and it has really stuck with me:
It is so easy to get caught up in the daily grind of checking off a list of concepts that students have mastered, then planning their next steps, AND catching kids who didn’t master the concept, planning appropriate interventions, while simultaneously juggling 20+ personalities in the classroom, their families, and professional obligations. It shouldn’t be surprising that we end up with students who are good at school, but lack the skills to do well when they leave here. I think part of the problem is that we have slowly squished the joy of learning out of our school day.
If asked, “Why do you teach?” I’m sure that many educators would respond with something like, “I teach because I love watching a kid’s smile when that light bulb goes off, and they finally understand it (whatever it is).” Most educators love learning and want to share that love with others. It is the joy of learning, not test scores, that inspires us to come back day after day, year after year.
Given the demands of this job, it is easy to forget or let that feeling of joy get buried in all the other “stuff”. Finding a way to recover that joy can be challenging, so I wanted to offer a few resources to reignite the joy of learning for you and your students.
Wonderopolis
This website is great for students to explore topics they are interested in or find explore topics they had never even considered. The site features a Wonder of the Day question accompanied by a short article, video, and photos/graphics to help explain the answer. I love that the website was designed to be accessible to lots of learners. The graphics make it easy to navigate, and the best part is you can have the articles read aloud while the words light up. There is an option to create an account, however, it does require parent permission. And since an account is not necessary to use the site I would avoid going this route with students.
Mystery Doug
This site offers a little less flexibility, but has some really great resources. Doug used to be a teacher, but now he answers questions he receives from students. If you sign up for a teacher account you will get a new video emailed to you each Monday, and the videos often correspond with current events (recently he answered questions about the Olympics, and this week with St. Patrick’s day it is about rainbows). A cool built in feature is that at the end of each video your class can vote on the topic for the next week, you can also submit a topic for Doug to answer. This is a great resource to have on hand for a brain break, snack time, indoor recess, or when you have a guest teacher.
BrainPOP
This is an oldie, but goodie. Did you know that BrainPOP is almost 20 years old?!?! Not only can you access great educational content, but the featured video can be accessed without any login. The videos always start with a question and include humor and engaging graphics. BrainPOP has also expanded to be more than just a video and quiz platform. By signing up for a My BrainPOP account teachers can assign different activities for students and give them the opportunity to create as well as consume information.
In discovering these resources, I kept coming back to the idea of Genius Hour. Genius Hour is great, but I know from experience that facilitating a full blown Genius Hour can be overwhelming, particularly with younger students who need more assistance. So my thought is this: instead of working through a huge project, try to find some time even if it just a few minutes a week to give students time to explore these resources. Perhaps if they finish their work early, they can have some time to look up something that interests them. Or one day during their read to self time they get the opportunity to explore something they have been wondering about. As far as keeping kids accountable for their research, there are lots of quick easy ways to do this: 1. Post on Seesaw 2. Post on Padlet 3. Post on Flipgrid 4. Respond to a question on Google Classroom 5. Post on a bulletin board in the classroom (yes, low tech is great too!) The best part about having students share is that they can learn from each other, and be inspired by their peers to learn about other topics. Spring is the time of year when everything feels renewed, refreshed, and happy. I hope that you can find some time to renew the joy of learning for your students, refresh your passion for teaching, and lastly, I hope that in the next few months your classroom is a happy place with smiles and lightbulbs! Happy Spring!
Humans are social beings. We naturally want to talk, share, and connect with others. I believe this is part of the reason that social media has become such a huge part of our society. It appears that social media isn’t going to be going away anytime soon, so love it or hate it, using social media is a skill that our students will likely need in their futures. If you teach high school or middle school, your students probably have accounts on Snapchat, Instagram, Twitter, Tumblr, etc. so teaching them responsible ways to use these platforms doesn’t seem outlandish.
But what if you teach in an elementary school? These students cannot lawfully have a social media account since they are under the age of 13. Eventually these students will need to have the skills to successfully navigate social media, so how can we start preparing them at a young age? Fortunately in the last few years platforms have emerged to help teachers tackle this task. Tools like Seesaw, Flipgrid, and Padlet have designed safe, kid friendly platforms where students can safely share their ideas and their work while practicing their online communication skills that will be essential in their futures. (Note: just because the legal terms of a product say they cannot use it, some adolescents with or without the consent of their parents choose to create and use an account anyway.)
This begs the question, is it the responsibility of our schools to teach children this skill? In my opinion, YES! Just like we teach character education, I believe that teaching these skills will not only positively impact our students long after they have left our buildings, but it fits with what we know about best practices. It is a well known fact that students learning by doing. If they can explain a concept in their own words and in their own way, then we know they have truly learned it. I love this quote from Janelle Bence:
Authentic learning is not demonstrated by a worksheet that’s turned into a teacher. That may be more appropriate to indicate progress in a particular more isolated skill. Real learning, however, is manifested in learner creations that are published for consumption by a wider audience.
Bence, J. (2016, May 17). The benefits of sharing student work in online spaces. In KQED Education. Retrieved February 7, 2018, from https://ww2.kqed.org/education/2016/05/17/the-benefits-of-sharing-student-work-in-online-spaces/
So with the idea that using social media is a life skill, and true learning requires more than just worksheet completion, where do we begin? Lucky for us, some very talented and creative educators have come up with ideas on how to combine the content and skills they are already teaching with the posting, sharing and connecting that students want and need to practice.
Book Talk
A book talk proves you read the book and encourages others to read it. Think about it like a commercial for the book, you want to entice others to read it without giving away the ending or any surprises.
A book review is very similar to a book talk, but your ideas are communicated in writing rather than speaking. Short and simple is the key! You want to summarize the book and get others excited to read it without spoiling the ending.
What tools can student use?
Padlet-example
Seesaw-Activity
Google Classroom-Question
A book trailer is a commercial for a book, just like a movie trailer it creates excitement around the story using images, music, and purposefully selected words and phrases. Book trailers are intended to be short and exciting for the viewer.
What tools can students use?
iMovie-share on Seesaw or Flipgrid
WeVideo-share on Seesaw or Flipgrid Planning Sheet
A book snap is a picture of a page in a book that a student found interesting, insightful, or stuck out to them for any reason. Students use a digital tool to annotate and share their thinking about what they read and share it with others.
As you are well aware, during February we celebrate I Love to Read Month. As I step back and reflect on reading instruction in our classrooms, and all of the preparation that goes into teaching a child to read, and think, and understand, and comprehend, and analyze, and synthesize.....(the list goes on and on), I realize that teaching a child to read is truly an artform! In the middle of all of this high level academic work, it's also important to note how much children of all ages love to listen to someone else read a story. Not reading with an instructional goal in mind, but just reading. Reading for fun!
Study after study confirms that reading aloud to children is so beneficial in so many ways. The older our students get the less of a priority reading aloud becomes both in school and at home. My first year teaching fifth grade it took almost the entire year to get through one read aloud chapter book because we just never had enough time. Or, if I'm being honest, it was because I never made it a priority.
The reality of our education system is that there is too much to teach and not enough time, and this is where I feel that we can leverage our technology resources to offset SOME of this imbalance. You may not have time to do a whole class read aloud as much as you would like, but there are so many recorded read alouds that students can access.
Just to be clear, I am not by any means equating a recorded read aloud with an in person one. Everything is always far more engaging and authentic in person than on video, but if you are looking for a way to give your students exposure to more books, more words, more ideas, more cultures, and increase their love of reading then I recommend you check out these resources. These can easily be shared with students through Seesaw or Google Classroom, or posted on your classroom website for easy access.
Websites
These should all work on desktop, chromebook or iPad. Storyline Online: Videos featuring celebrated actors reading children’s books alongside creatively produced illustrations. Just Read Books Aloud: Books read aloud by normal people and kids. Typically the reader is not shown, just the pages in the book. *Site does contain ads. Kids Read 2 Kids: Abridged version of classics read by kids. The reader is shown instead of the pages in the book. Also don't forget Tumblebooks andBookflix have "read alongs" and in EPIC! students can choose to listen to audiobooks or "read to me" books.
YouTube Channels
Wait, don't be scared off! I know that lots of teachers shy away from using youtube with students because it is easy for them to become distracted with all of the related videos and ads. But YouTube is an unbelievable resource! To minimize the distractions, I suggest using viewpure.com prior to sending your students a video. All you have to do is copy the link from YouTube, paste it into viewpure, and click "purify." This will pull up a simple screen with JUST the video.
There are TONS of YouTube channels with great children's books read aloud. Here are just a few.
Books Read Aloud for Children (YouTube Channel): Books read aloud by a narrator. The reader is not shown, just the pages in the book.
Storybook Nanny (YouTube channel): Books read aloud by a narrator. The reader is not shown, just the pages in the book. Includes soft background music.
Katie's Bookshelf Classroom (YouTube Channel): Books read aloud by a narrator. The reader is not shown, just the pages in the book.
Are there any other great read aloud resources you use? Comment below or send me an email.
I am often asked "What is a good app for ______." Fill in the blank with virtually any concept, and the process is usually the same. I research a variety of apps, look on social media, check out app store rankings only to find a great app that either costs way too much or cannot be used by students under the age of 13. So imagine my surprise when I learned about Toontastic. It is FREE, and as far as I can tell there are no in-app purchases. It is also engaging, intuitive, and the final product looks great!
What is it exactly?
Toontastic is a creation app that allows students to easily produce their own cartoons while guiding them through the parts of a story or project. Students can choose a short story consisting of 3 scenes, a classic story with 5 scenes, or a science report.
Pros and Cons?
There are no logins to manage, and the projects are easily exported to the camera roll for easy sharing via Seesaw. I love that the app allows for a lot of student creativity, but also has some structure to help keep kids on track. Students can draw their own backgrounds and characters or they can use the premade ones. The app is definitely engaging, but it could easily become a distraction for some students. I think that making sure students have a plan for their story before they start using the app is crucial, otherwise they can easily get lost in all of the customization options.
Overall, I think this could be a very powerful tool for students to show their learning in a really creative way.
Check out the short tutorial below to see some of the features.
SMART Notebook has undergone some changes in the last year, one of the most notable changes is that the program no longer supports flash. While this has been a struggle for a lot of teachers who depend on flash based interactives from the gallery, the good news is the SMART LAB has been expanded and improved. SMART Technologies realizes that teachers don't have lots of extra time so they have tried to streamline the process of making customizable, flexible, and engaging games and activities for your students.
What is SMART LAB?
The Lesson Activity Builder (or LAB) was introduced in SMART Notebook a few years ago, but version 17 includes many more options to engage students than previous versions. There are 11 different activities to choose from including a games, assessments, and brainstorming activities.
How do I build an activity?
Click on the SMART LAB icon and select the type of activity you want to create. It will then walk you through the creation of your activity and the different settings available.
Where can I download pre-made activities?
You can find activities created by other teachers by searching on SMART Exchange. Search for the content you want and narrow your search results by LAB Activities.
Can I change pre-made activities?
If you find an activity from SMART Exchange that is good, but not exactly what you are looking for you can change it by clicking on the pencil icon in the top right corner.
How do students engage in the activities?
Some activities require students to have their own device, and others have the flexibility to be played on the SMART board as a center (or whole class) or can be accessed on individual student devices. To use their own devices, students will need to go to classlab.com. The website will prompt them to put in your class code. The code is an 8 digit number, but students should only have to type it in once. After that their device will remember the class, so all they need to do is select their name.
Can I see some examples of SMART LAB activities?
Yes! Here is a SMART doc that you can download to see some of the activities in action. Below you can also find a video where I demo some of the features.
Please let me know (via comment or email) if you would like some help getting set up or planning for a SMART LAB activity or if you have any questions!
Computer Science Education Week starts on Monday, December 4, and with that comes the Hour of Code! I am excited that our schools will once again be participating in this world wide event.
What is the Hour of Code?
“The 'Hour of Code™' is a nationwide initiative by Computer Science Education Week [csedweek.org] and Code.org [code.org] to introduce millions of students to one hour of computer science and computer programming.” The Hour of Code Challenge started in 2013 and since then millions of people have participated.
Why is Coding Important?
Our world is increasingly influenced by computers and technology. In almost any career, using technology is an essential skill. Beyond that, the ability to create something new or improve upon existing technology, is a skill that employers are looking for. Coding skills are valuable in almost any profession, not just in technology fields. Learning to code is really learning to problem solve. We all want our students to be problem solvers, so why not give them a little extra practice?
What will Teachers Do?
The most challenging thing for teachers will be to carve time out of their already busy day to include some time for kids to code. The goal is to have kids spend an hour TOTAL throughout the week, NOT an hour per day! This works out to about 12 minutes per day, so coding could be morning work or part of morning meeting. It could also be part of choice time or a center for the week. Teachers will need to choose which program they want their students to use there are several great options. There are many great options for every grade level. In the presentation below, I have linked several resources to help guide you through the week.
What will Students Do?
Students will work through the different levels of whatever program you decide to have them use. They will work with each other to problem solve, share their strategies and most importantly they will get the opportunity to learn some coding!
What will your students create using their coding skills?
If your students have Google accounts you should be using Google Classroom to help simplify how you create assignments, provide feedback and communicate with your students. Google Classroom is simple, user friendly, and can make your digital organization a breeze.
Five Reasons To Love Google Classroom
1. Organization
When you create an assignment in Classroom it creates a folder in your Google Drive with the same title as your assignment. Within that folder you will find all of your students' work for that assignment, and the best part is their name is in title! No more "no name" papers! As the teacher you can access their work either by going through Google Classroom or in your Drive. Students will also see a folder for your class, and all of their assignments will automatically be saved to this folder.
2. Templates
It is often challenging to get students to format a Doc or Slides Presentation exactly how you want them to. When students are not proficient in their keyboarding skills, and they are just learning how to navigate Google Apps, it is nice to be able to give them a template to work on. You can create Doc, Slide, Drawing or Sheet with the formatting set how you want it, and Google Classroom can make a copy for each student. No more "share, make a copy, share back"! This way students can focus on the content of their work rather than spending time adjusting margins.
3. Differentiation
Earlier this fall, Google Classroom added the option to send assignments to specific students. This is a huge step forward in the ability to differentiate! Since students do not see each other's assignments or work, you can now easily give assignments with different directions, expectations, or content while preserving student privacy.
4. Reusing Posts
The creators of Google Classroom understand that teachers spend lots of time creating assignments for their students, so they built in the Reuse Post option. This allows you to reuse an assignment from a previous year or from a different class. You can make necessary tweaks to the assignment and change the due date.
5. Planning Ahead
Another fairly new feature is the ability to save drafts of posts, and to schedule when things are posted for students to see. This is nice for projects or assessments that you know you will use throughout the year. You can set them up ahead of time and push them out to students when you are ready.
If you are looking to get started with Google Classroom, check out the tutorials below or contact me to help you get started!
I've noticed something interesting over the last few years. We often say that our students are digital natives, and they just "get" technology. While I believe this is true to some extent, I think there is more to the story. I would argue that the students I see in our K-5 buildings are very good at navigating devices, they can play games, message their friends, and oh boy can they mess with the settings on a device! 😉 However, I do see many kids struggle when it come to using technology to learn a concept or to show their learning. I think there is a big difference between being able to use technology for fun and being able to use technology to be productive.
It seems like Google also noticed this trend. Over the last few years, they have been developing a curriculum to "teach digital literacy through practical projects." Google's Applied Digital Skills Curriculum is free, engaging, and easy for educators and students to use.
The curriculum is intended for middle and high school students, and they recently added college and continuing education lessons. Even though the target audience is older students, I believe with the proper amount of scaffolding 3rd-5th graders can successfully complete some of the projects.
Last spring, a few of our 3rd grade classes tried out the first lesson and it went well! The first lesson is titled If-Then Adventure Stories, and below you can see the outline of the lesson.
There are 4 different activities in this lesson. However, since this one is the first lesson in the curriculum, the first activity is simply an introduction to Google. The last activity is always a reflection on the project.
Each activity includes tutorial videos that walk students through the steps of using Google Apps to collaborate with each other and create their story. Given the age of our students it might be better to modify some of the directions. For example, the videos instruct students to open a new document and share it with their group members. You may want to set this up ahead of time through Google Classroom so that you can also access their work if needed.
The narrators in the videos do a nice job of explaining the objectives for each section, providing examples, and giving clear directions of what to do next.
Ideally this would be completely self-guided and the teacher would only need to check in with students periodically throughout the process. This would be great way for students to use their WIN time purposefully if they are not in an intervention group. Or it would be a project that students could work on over a long period of time when they complete their other work in class.
Where to Start
There are several lessons in the curriculum, but I believe that a few would be good for 3rd-5th grade students.
If-Then Adventure Stories
Students write a choose your own adventure story, and create links to lead the reader through the story.
Plan an Event
Students plan and advertise and event. They create a logo, a flyer, and a website to promote their event.
Plan and Budget
Students research and make decisions about long term spending, contract, and loans. *High level math skills required.
These lessons give students a chance to create projects that they can be proud of, and it gives them the confidence to apply those skills in other situations. The hope is that by providing students with the opportunity to learn these skills at an early age, they will be more prepared to navigate our digital world. We need our future leaders to do more than chat with their friends and play games, we need them to use the power of technology to make an impact on the world!
As always, feel free to comment below or reach out to me if you want to get your students started on these lesson!
I got a lot of great feedback from last week's Tech Tuesday post about Seesaw Connected Blogs, so I wanted to continue on the the theme of connecting classrooms through technology.
When I first heard of Mystery Skype a few years ago, my initial thought was that it would be great to incorporate it into geography units, especially in 2nd grade and 4th grade where U.S. geography is a focus in our standards. But as I started to learn more about how the game works, I realized that Mystery Skype is about so much more than geography. It encourages critical thinking, collaboration and communication which are all things we want our kids practicing in our classrooms everyday regardless of the content area. The other great thing about playing Mystery Skype is that it really is not a huge time commitment. Depending on a lot of variables, a typical call can last anywhere from 15-30 minutes.
How it works
You call another class on Skype. You as the teacher will have arranged the time and day with the teacher from the other class, so you will know where they are located, but it is important NOT to share this information with your students.
The classes take turns asking yes or no questions to try to narrow down where the other class might be. For younger students it is vital that you spend some time discussing questions that are broad (Does your state border another country?) vs. specific (Does your state start with an A?). Also, you will want to avoid questions that don't have a clear yes or no answer (Is it cold where you live?).
Your class also has to be prepared to answer questions from the other class. It would be good to review some basic information about your state prior to expecting kids to answer questions. For example, here in Minnesota we have a tough time answering the question, "Is your state west (or east) or the Mississippi River?" Since the Mississippi River starts in our state this is tricky. In all the classes I've been in, we've said that we are west of the Mississippi since it runs along our eastern border.
After both classes have guessed where the other class is, it is nice if you can schedule a little time for sharing facts about your own state or community. This can be as simple as the name of your school/town, how many students are in your school, your mascot, what your hot lunch is for today, the temperature outside, etc. You can also have your class do some research ahead of time and share facts about your state such as state bird, flower, animal etc., the highest and lowest recorded temperatures, or some unique facts about your area.
Management
Figuring out how to structure your class during a call can be a bit overwhelming. While working with some 1st, 2nd, and 3rd grade teachers over the past year, we have come up with this plan:
It certainly isn't perfect, and every class is different so you may need to change up some of the roles to make it work for your students.
It is also important to provide your students with a variety of maps. For older students you could give them some links to online maps, and/or show them how to navigate Google Maps, but we found that for younger students having paper maps works well. Students can also use this website to "cross off" states they have eliminated. Here is a folder with some maps and other resources we have used.
Options
Mystery Skype is not limited to just figuring out the state the other class is from. Students can also try to guess the exact city or school the other class is located. This is much more time consuming and is probably best to do after you have some practice playing Mystery Skype. Another option is to play Mystery Number. In this game each class selects a number and tries to guess the number of the other class. This is a great game for developing number sense. If you are short on time, or can't find anyone to connect with, but still want to play a game, you can play the 5 Clue Challenge. These are pre-recorded videos where the person gives hints as to where they are. Students have to guess where in the world the person is in just 5 clues.
Mystery Skype is a fun engaging game that you and your students will love! If you would like some help getting started or want to talk with a colleague who has done it before, please reach out!
I am starting my third year in my position as a tech integration coach, and I love my job! I get to work with all of our amazing K-5 teachers, and be a part of the awesome experiences they create for their student and families using technology. However, there are times when I miss having my own group of kids to work with. Watching our teachers and students participate in the Global Read Aloud this year has made me a little jealous of our classroom teachers! There are so many great ways that we can connect our students to others using technology, but the one that has stuck out to me lately is Seesaw Connected Blogs.
Seesaw all by itself is kind of life changing. If you are not using it in your classroom already, I highly recommend it! It is the easiest way for students to share their work with an authentic audience (their classmates and families). Not to mention you as the teacher can see and hear student thinking in ways that are impossible using a traditional paper journal.
The blog feature in Seesaw takes this authentic audience to a whole new level. From your teacher account you can connect your blog with other classroom blogs in your school or around the world. Students can post their work to the blog, and get feedback from peers in their own class or other classes. They can also see other students' work and make comments. This whole process might seem trivial, but think of the message we are sending to our students when we do this:
1. Your thoughts are important and others want to hear what you have to say. This can be so empowering for all learners, but especially those who may lack confidence in their ability.
2. Other people in other places share your thinking, or they have have a different perspective/option. The can be a great teachable moment about culture and about how we all have similarities and differences, and that's what makes this world great.
3. When posting online, it is important to think about your digital footprint. This can be tricky to teach unless we give students a place to practice being safe and respectful online. Check out this AWESOME presentation on teaching kids how to comment from @Mrssmithop220.
The best part of this is that it is EASY, safe and appropriate for our young students. Everything that goes to the blog is moderated, so all the work and comments come to you for approval. If you are looking for a classroom to connect with, check out this shared document where teachers add their blog information. You can also add yours so that others can find your class and connect with you!
It can be scary when you start to open up your classroom to the outside world, you want to keep your kids safe online, and you want to make sure that the tool you choose doesn't require hours and hours of maintenance on your part. In my option, Seesaw Blogs are the best way to create connections outside of your classroom. If you are looking for a tool for the Global Read Aloud or just looking to connect with other classes somewhere else in the world, you should definitely give Seesaw Blogs a try!
Check out the two videos below to get started, and as always feel free to comments below or contact me with questions.
Getting Started With Seesaw Blogs
How to Connect to Other Blogs
Please note: this video is a little outdated. The interface looks a little different, but all the features are still the same.
Many of us are gearing up for the Global Read Aloud and through this process, several teachers have approached me about Padlet.
There are two things that I LOVE about Padlet. The first is the versatility! It is basically an online cork board where you can add notes, videos, images, or links.
The other thing I love is that students DO NOT need a login to add something to your Padlet. So it is a quick and efficient way to get students to collaborate or show what they know. Also, it's easy to share your Padlets with students via Seesaw or Google Classroom. The possibilities are endless!
Have you heard of this?!?! Flip Grid is a highly versatile tool that all teachers will want in their arsenal of tech tools.
We all have all kinds of students in our classrooms; the quiet kids who have wonderful ideas, but never want to speak in front of their peers, the kids with great insights who struggle to write their ideas on paper, or the kids who have no problem sharing, but can get off topic. With Flip Grid you can give the quiet students a voice, give the struggling writer a way to express himself/herself, and give kids a limited amount of time to get their ideas out (with unlimited chances to re-record).
Flip Grid allows you to set up a "grid" (think class) where you can post "topics" for your students. Students respond to your post, which can be written, video you record, video you upload, images, or anything in your Google Drive. You get to control the privacy settings (password protection) and choose if students can post automatically or if you need to approve their responses first.
Check out this video tutorial from Stacey Roshan (@buddyxo) on how to set up your teacher account and start your first topic.
I've decided to start a new little project here on Nett on the Net called Tech Tuesdays. In my position as an instructional coach, I often struggle with how to provide my colleagues with new information in a way that is not overwhelming. My goal is to write a new post each Tuesday that will provide a tip, trick, or tool to enhance your teaching or make your life as an educator a little easier.
Check back next week for the first installment of Tech Tuesday!